Success with Moss and Coco-Fiber Baskets
Learn how to plant and create moss or coco-fiber hanging baskets, a how-to guide.
Learn how to plant and create moss or coco-fiber hanging baskets, a how-to guide.
Our house has a wrap-around porch and every year I plant and hang seven baskets around it. Four years ago, shortly after we bought our house, I was on a mission to find hanging baskets for the porch. I didn't want to buy finished baskets, I wanted to plant my own. I also didn't want Plain Jane plastic baskets. I wanted something that was decorative. It took me a while, but I finally found coco-fiber baskets that I really liked. They look nice, are 14 inches in diameter and are also fairly deep. I wanted larger baskets because they will dry-out less quickly. Learn more about choosing and caring for hanging baskets here.
The first year, I simply added soil to the baskets, planted them up and away I went. Before long, I began to hate watering my hanging baskets for two reasons. First, they dried out really fast so I was watering a lot, sometimes more than once a day. Coco-fiber and moss baskets dry out more quickly because they evaporate water through the sides of the basket. Plastic pots do not evaporate water through the sides of the pot. Wind is able to pass through the porous sides of moss and coco-fiber baskets, which also increases water evaporation from the soil.
The second reason I hated watering was that water would come pouring out of the sides of the basket. I was trying to completely soak the entire root ball of the basket, but that was difficult when water was always escaping through the sides of the pot. I felt like I had to pour on a ton of water to adequately water each basket and most of that water was falling on the porch. I vowed to find a better way to do things the next year. My solution is lining the pot with plastic.
I started out searching for a plastic liner I could simply insert inside the basket. I wasn't able to find liners, finding one to fit my baskets was impossible and I'm not certain they existed back then. You can now buy coco-fiber pots that have plastic or fiberglass liners (Hooks and Lattice is one company with liners - there are others) and even pots with water reservoirs to cut down on watering. However, you can get the effect of a liner while recycling plastic bags.
How To Guide
Step 1: Choose your hanging basket and buy your potting soil. Make sure you are buying a nice light potting soil, look for something made up largely of peat and perlite. These mixes are light and fluffy and contain enough air space for good root growth. Most potting soil will come in bags and will be pre-moistened. If you buy a bagged soil you can skip to Step 3. I use a lot of potting soil each year and if you can find it, bales of potting mix can be a better deal than the bagged version.
Step 2: If you are using a baled version of potting mix, you will need to moisten the soil before you use it. The easiest way I have found to moisten baled potting soil is with a wheelbarrow. Open the bale of soil and scoop or pour some of the potting mix into the wheelbarrow. It is compressed and dry - you may be breaking off chunks from the bale. Using a shovel with a rounded edge, break up the chunks of dry soil by smacking them with the back of the shovel. Then take a water hose with a nozzle that has a "shower" setting or use a watering can to moisten the soil. Using the shovel, turn the soil over - mixing it together to distribute the water. Alternate adding more water and mixing the soil until you get nice moist soil. It should be damp, but if you grab a handful you should not be able to squeeze out much water.

Step 3: Once you have the soil moist, it is time to line your baskets with plastic. I have been using plastic bags to line my baskets for several years. I first tried a grocery bag, but it was a bit small and didn't quite fit my baskets. I have been successful using black garbage bags and Target bags for liners. I plan on continuing to use Target bags in the future. To use them, I first cut off the handles. Then I find the center of the bottom of the bag and cut out a large circle (at least 6 inches across) - it doesn' t need to be perfect. Then place the bag inside the basket, make sure to spread out the bottom of the bag so that the circle (drainage hole) is open. The bag is going to have a tendency to want to blow around. Once you get a scoop or two of soil in the basket, it will anchor the bag. As you add the soil be sure the hole stays open - this is for drainage. If the bag isn't quite large enough, you can cut a slit in the bag so it lies flat along the coco-fiber liner.

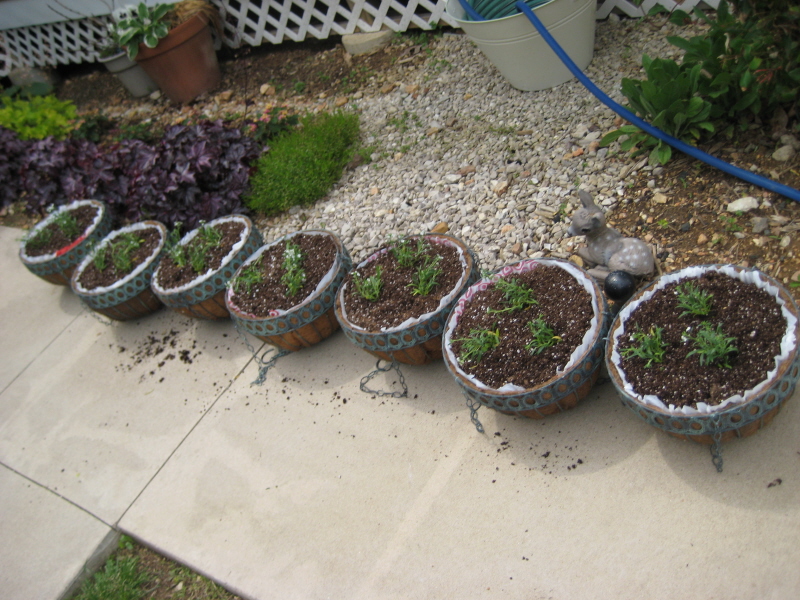
Step 4: Once the bag is anchored finish filling the basket with soil. Then trim off the excess plastic. I like to leave at least half an inch sticking up above the soil. This extra material works as an edge to help keep the water in the basket. The basket second from the left, in the photo below, is trimmed and ready to go.

Step 5: Mix some controlled release fertilizer into the top layer of soil, according to package directions. This will ensure your plants have food for growth.
Step 6: Place the plants in the top of the basket. There is no need to plant in the sides of a basket, not even with a large basket. Choose strongly trailing plants and they will quickly grow to cover the basket. For a 10 or 12-inch basket, I would use three 4-inch plants. For my 14-inch baskets, I still use 3 plants, although 4 would be fine too. When planting, you want to space the plants evenly - leaving some room between the plant and the edge of the basket. I used very small plants for these rather than 4-inch plants. I prefer to use 4-inch, they fill out much quicker. I also usually give my plants a light trim right after I plant them. This encourages additional branching and helps the basket look really full. It isn't necessary, but it will probably give you a better final product.


Step 7: Using a watering can or the "shower" setting on your hose nozzle, lightly water the plants to settle them into the soil. They are now ready to hang. Right now you can see the white plastic - eventually the plants will cover this and you will no longer see it. If you don't like this look, black plastic will blend more with the soil. The photo on the left, below, is right after I planted the basket. The one on the right was taken a month later, you can no longer see the plastic bag at all.


All that is left, is to keep your basket looking good for the rest of the season. To read more on taking care of your hanging basket, click here.


