Planting Newly Purchased Plants
Learn more about planting new plants and caring for your plants until they are established.
 You have finally made your decisions and hauled your new plants home. It is time to get them planted in your landscape. If you are a new gardener, knowing exactly how to planting new plants and get established can be daunting. Many people think of plants as delicate, but that isn't necessarily true. Some plants need to babied, but if you choose plants that are well suited to your area they are a lot tougher than we may give them credit for. However, it is still better to give your plants the best start you can. We already have an articles on how to prepare your beds for planting and choosing healthy plants when shopping, but these don't really cover the actual planting instructions. This article will cover the actual process of how to plant new plants.
Once your general flower bed prep is finished, it is time to dig in and add the plants. I usually start by sitting each plant, in its original container, where possible, in the bed so I can get a feel for the placement and arrangement of my plants. Once I have the plants arranged how I want them, I grab my trowel. Normally, I will have added compost to the bed during the bed prep phase, if I haven't I will get some compost and have it ready to amend my soil when planting. If I am not using compost in the bed, I will generally incorporate some slow-release fertilizer, according to package directions, to get the plants established and growing well.
I then dig a hole about twice the size of the container that I am planting. When planting new plants, you want a hole that is larger than your plant to give the roots nice  loose soil in which to grow. If I am adding compost or slow-release fertilizer, I will mix this into the soil just dug from the hole. Add some soil back into the hole, so that when you place the plant in the hole, the surface of the soil in the pot is level with that of the ground. Remove the plant from the pot. To remove plants from pots without damaging them, an excellent tip to planting guide is to roll the pot or squeeze it between your hands. This will loosen the plant in the pot. Then gently grasp the plant near the soil line, and tip the pot over while gently pulling the plant. It should pop out of the pot. Check to make sure roots are healthy. If the plant is root bound, rough up the roots prior to planting. Place the plant in the hole and fill in with the soil previously dug. Pat the soil gently into place, but do not pack it down. Use a watering can or a gentle stream to water the plant in. This will settle the soil and ensure that the plant has sufficient moisture and how to plant new plants successfully.
Once the plant is in the soil, you will need to take extra care for a few days, weeks or months. For annuals and perennials, you will need to watch newly planted plants closely for a week to 10 days and water if the plants are wilting. I check newly planted material once a day, sometimes twice. Pay special attention if it is a warm, sunny day or if it is windy. Plants will dry out more quickly under these conditions. After a week to 10 days, plants should be established well enough to not need extra care. This is not to say watering won't be necessary. To learn about the best way to water landscapes click this link in our planting guide.
Trees and Shrubs - General
 Shrubs and trees, also called woody ornamentals, take longer to establish in the landscape. The general process for planting them is the same, but the establishment phase takes longer. The best time to plant trees and shrubs is usually fall, but spring works well also. Fall is the easiest time to establish woody ornamentals because the temperatures tend to be cool. You are more likely to have rain, and the plants will have fall, winter and spring to establish a root system before the weather gets hot and dry. Some woody ornamentals are planted in flower beds, but many of them are planted alone or in groups, but not in actual beds.
Whether you are planting in a bed or in a lawn area, you are still going to need to dig a hole that is 2 to 3 times wider than the root ball of the shrub or tree you are planting. However, the hole should be just deep enough for the plant to fit. Some professionals believe that many shrubs and trees planted by homeowners are planted too deep. When in doubt, remember it is better to plant not deep enough rather than too deep. Err on the side of shallow.
Since shrubs and trees tend to be larger than annuals and perennials, you may need to use a shovel rather than a trowel. Once you have the hole dug, incorporate some slow-release fertilizer into the soil (according to package directions). Fill in the rest of the hole with the previously dug soil. Pat the soil into place without packing it tightly. This nice loose soil gives your newly planted tree or shrub a nice place for the roots to establish. Be sure to water the plant in afterwards.
Tree and Shrub Forms
If your woody ornamental was in a pot, there will be minimal root damage from planting. If your plant is bareroot, which is most common with perennials and shrubs, its roots will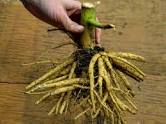 have been traumatized. The roots of these plants must be kept damp until you plant. Wrapping the roots in wet towels or soaking them in a bucket will keep them moist until you can plant. Bare root plants will generally need a wide but shallow hole for planting, large enough for the roots to be spread out flat on the soil and then covered. As you place a bare root plant into a shallow hole you will need to carefully spread the roots out so the plant is stable once the soil is added. Try to plant so that the soil level is level with where it was originally.
 Your shrub or tree might also be balled and burlapped or in a wire basket (or both). This technique is most often used with larger size trees and shrubs. A balled and burlapped tree is planted similar to a plant in a pot, only you leave the burlap on the plant. Once it is situated in the planting hole, cut or untie the twine holding the burlap in place, back fill with soil, making sure the burlap is completely covered. Leaving burlap exposed can pull water away from the roots of the plant. The burlap will decompose over time. The wire baskets can also be left in place, but the wire should be completely buried. One excellent for plantings instructions is removing the top part of the wire to make sure that none is above the soil or almost above the soil. Exposed wire could be hazardous. Leaving the top of the wire can also eventually girdle a tree and kill it. To be completely safe the wire basket can be removed.
Watering
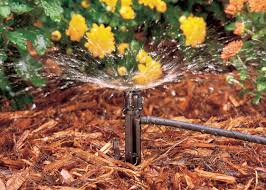 Trees and shrubs will take longer to establish and will need to be watered for a longer period of time. One of the easiest ways to keep your newly planted woody ornamental watered is to use a drip irrigation system. If you aren't going to use drip irrigation, you may want to use soil to form a shallow basin around the plant. This will help hold water near the plant. For small trees and shrubs planted from pots, 2-gallon and smaller, watering for 2 to 3 weeks after planting should be sufficient for establishment.
For successful planting guide on how to plant new plants for larger ones, you will need to water for a longer period of time. Large trees and shrubs will need extra water for several months. Until the roots grow into the surrounding soil, the entire plant depends on the water available from the root ball. This can be a rather small amount of water for a large plant. In the beginning, it may be necessary to water every couple of days or even every day if the weather is warm. As the plant establishes a larger root system, you can water less often. After several months the plant should be fine on its own.
It is often tempting to think the more water you give a plant, the happier it will be, however over-watering can be a real problem. If you keep a plant too wet, a helpful planting instruction is to either drown it or keep it from establishing a good root system. Regular deep soakings are better than daily splashes of water. The soil must receive moisture down to at least 12 to 18 inches in order to encourage root growth. For most newly established tree plantings, you need to water once a week, especially if there has been no rain. During the heat of the summer, you may need to water more frequently.
When in doubt as to saturation at root level, dig! To check, dig with a trowel down 6 to 8 inches at the edge of the planting hole. If the soil is moist enough for root growth at that depth, the soil will form a ball when squeezed in your hand. If the soil is crumbly rather than sticking together, get out the hose.
If you are planting a large tree you may want to use supplemental water for 1 to 3 years during hot and dry periods. Once well established, woody ornamentals should need little to no supplemental water during a normal spring and summer. In extreme drought conditions, supplemental water may be helpful.