
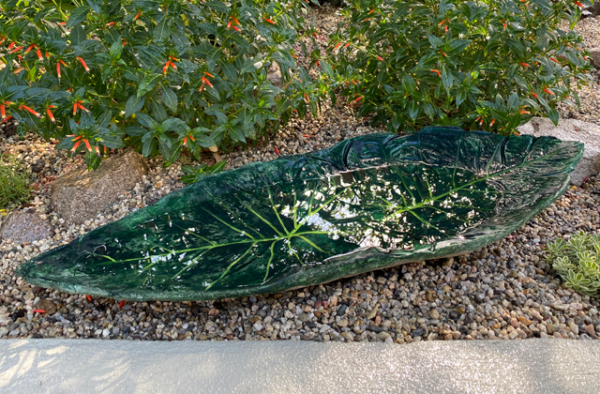
Colocasia Leaf Bird Bath
Colocasia Leaf Bird BathMaterials • Two large colocasia leaves |
• Directions •
 Arrange Your Colocasia Leaves Back to Back Lay your two large colocasia leaves back to back on your work surface so that the tips of the leaves are facing in opposite directions. You’ll want the two leaves to overlap so that there is no gap in the middle between them. Plant Tip: We used the leaves of Heart of the Jungle® Elephant Ear’s Colocasia | 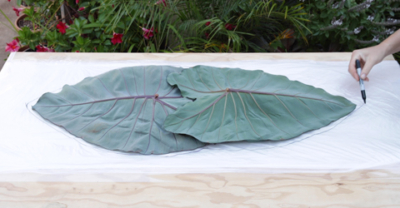 Make An Outline Of The Planter Shape Use a black marker to trace an outline of the two leaves on the plastic drop cloth. This outline will be your visual guide for the next steps. |  Pour and Shape Sand Inside the Outline Pour and shape sand inside the outline you drew. Mound more sand in the middle and taper it off around the edges. |
 Place the Colocasia Leaves Back in Place Put the colocasia leaves back in place on top of the sand mound. Again, make sure that there is no gap in the center where the two leaves overlap. | 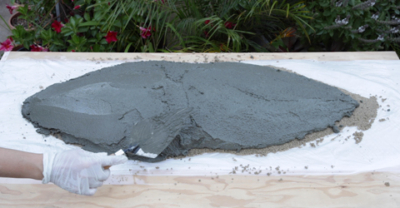 Cover the Leaves With Concrete Pour a layer of concrete over the colocasia leaves. Aim for a layer that’s about a half of an inch thick. Smooth the concrete with a trowel as you work. |  Trim Off Excess Concrete After you have smoothed out the concrete layer, make sure to trim any excess concrete around the edges. Aim for a clean border all the way around the edges. |
 Allow Concrete to Dry for 24 Hours Allow the concrete to dry for 24 hours before moving on to the next step. |  Clean Leaves Off the Concrete Now that the concrete bird bath is dry, you can flip it over and clean off the leaf material that’s left behind. You can use a hose and a scrubbing brush if you have any trouble peeling the leaves off from the concrete. 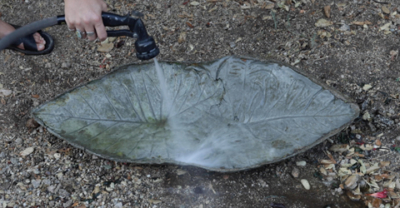 | 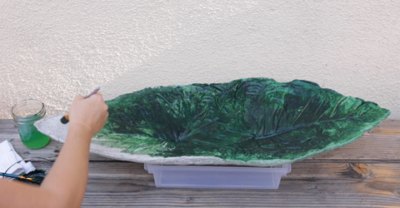 Paint the Bird Bath This step is totally optional! If you prefer the look and texture of the raw concrete, you can place the finished bird bath in your garden and fill it with water. We opted to paint the concrete to make it resemble the original green colocasia leaves. If you choose to paint the bird bath, a craft acrylic paint will do well and hold up over time outside in the elements. |
• Helpful Tips •
Set up a spacious outdoor work area. Working with concrete can get a bit messy, so you’ll definitely want to do this project outside.
Don’t rush the concrete drying process. We recommend leaving the concrete to dry for 24 hours, but your mix ratio may be a little different or you could be working in an area with more humidity. If the concrete still looks dark and is wet to the touch after 24 hours, give it some more time. Check on it periodically until you’re satisfied that it’s dry.
Have a buddy help you move the dried bird bath. The finished bird bath will be fairly large, so it’s much easier to move it around with two people.
Have fun painting! We went for a realistic leafy look, but you can paint the bird bath however you like. Get the kids involved and turn it into a family painting project!